5/16/2008

The dbo.tabs.IconFile field issue

The case is fairly simple: In a DNN installation, we needed the user to use the IconFile field (i.e. the "Icon" field in the Advanced Settings section of the Page Properties page to add a custom icon to each page they made. We would then use a query created in Bi4Ce's ListX module to present a list of pages in the form of an in-page navigation menu for a specific portion of the portal.

To our horror, we discovered (using DNN version 4.8.2), that the IconFile field in the Tabs table takes two types of values: Either a value like "FileID=xxx", where xxx is the id of a record in the Files table, or the full path of the image file (Portals/0 is implied, so the file path is starting with the next sub folder).

That is, if you've set the icon to be in portals/0/myimages/myimage.jpg, you either get an entry in the Tabs table like "FileId=2312", or an entry like "myimages/myimage.jpg". At this point we are not sure why this is happening, but the truth is we don't care. We just want the path to the actual file either way.

In the case of the fileid thing, you can get the path by joining the tabs table with the files table and then the files table with the folders table (the folder path itself is in the folders table) and voila. In the case where the full path exists in the IconFile field, you obviously don't need to do anything else.

We created a query which decides on what to do and produces a result set with two fields: tabid and img where img ALWAYS contains the full path to the image file (provided that one is set for the page), regardless of whether it's in the form "FileID=xxx" or in the full path form, and I'd like to share it with you.

You can easily make a view out of it and use it where appropriate. It hasn't been tested on multi-portal installations, maybe things will differ a bit there. Comments are always welcome. Here goes:


select
tabid
, case
when ltrim(rtrim(iconfilepath))=''
then folderpath+filename
else iconfilepath
end
as img

from
(
select

tabid
, taborder
, case
when patindex ('FileID=%', iconfile) >0
then convert(int, replace(iconfile, 'fileid=', ''))
else 0
end
as iconfileid
, case
when patindex ('FileID=%', iconfile) =0
then iconfile
else ''
end
as iconfilepath

from
tabs
where
isdeleted=0


) mytabs

left outer join files
on files.fileid = iconfileid
left outer join folders
on files.folderid = folders.folderid

order by
taborder asc


Read more...

3/13/2008

Solving the Search Results problem when using the free MMLinks localizable module

(This article assumes that you have an advanced knowledge of what's going on inside the DotNetNuke portal framework and its Search indexer.)

For those of you who don't know what the MMLinks module is, go here to find out.

(waiting for you to read...)

Okay, now you know. With MMLinks, you can replace your standard Text/HTML modules with fully localizable ones, localizing both the title and the Text/HTML part. With one slight defect: Since DotNetNuke's search indexer doesn't know anything about the localized titles, it insists on presenting the default, non-localized module title in the Search Results page (that would be "MMLinks" if you leave it intact).

The reason for this is that localized titles for the MMLinks modules are kept in a different table: Delisoft_MMLinksTitleLocales. DotNetNuke doesn't take this table into consideration when indexing, so no localized titles in Search Results.

I tried to solve this problem by creating a trigger which affects the core SearchItem table. That's right, the table where all indexed items are kept. The trigger investigates whether the row being updated belongs to an MMLinks module instance (by checking the ModuleDefinitions table). If it does, it replaces the contents of the Title field with the localized MMLinks title. Since MMLinks modules produce one entry for each locale, voila. You've got localized MMLinks titles in Search Results (which, by the way, uses the contents of the SearchItem table).

I am providing this code in order to receive comments and / or improvements to it. Please do not use it anywhere near sensitive data or production databases. It may not work correctly.


So, first, a catch-all disclaimer to make the above statement even stronger :) :

CAUTION: THE TRIGGER HAS BEEN ONLY TESTED A COUPLE OF TIMES. IT IS SUGGESTED THAT YOU DO NOT USE THIS CODE IN A PRODUCTION ENVIRONMENT. IT IS STRONLGY ADVISED THAT YOU BACKUP YOUR DOTNETNUKE DATABASE FIRST. I DO NOT TAKE RESPONSIBILITY FOR ANY MALFUNCTION OR DATA LOSS THAT MAY RESULT FROM USING THE CODE PROVIDED HERE. USE AT YOUR OWN RISK.

And now, the code:


SET ANSI_NULLS ON
GO
SET QUOTED_IDENTIFIER ON
GO
-- =============================================
-- Author: Tool
-- Create date: March 2008
-- Description: A trigger which changes the title
-- field in the SearchItem table and replaces it
-- with the LOCALIZED title when using the MMLinks
-- module. USE AT YOUR OWN RISK.
-- =============================================
ALTER TRIGGER [dbo].[tr_Tool_setLocalizedTitleForMMLInksModule]
ON [dbo].[SearchItem]
AFTER INSERT, UPDATE
AS
BEGIN
-- SET NOCOUNT ON added to prevent extra result sets from
-- interfering with SELECT statements.
SET NOCOUNT ON

DECLARE @searchItemId int
SELECT @searchItemId = searchItemId FROM Inserted

DECLARE @moduleid int
SELECT @moduleid = moduleid FROM Inserted

-- Do work ONLY if entry in SearchItem table concerns an MMLinks module instance.
IF EXISTS
(
SELECT
ModuleId
FROM
dbo.Modules
WHERE
ModuleDefId in
(
SELECT
ModuleDefId
FROM
dbo.ModuleDefinitions
WHERE
FriendlyName ='MMLinks'
)
AND ModuleId = @moduleid
)
BEGIN

DECLARE @localetext nvarchar(150)

--Get the localized text
--In order to find the localized text, we use a trick.
--MMLinks fillds the SearchKey column in the SearchItem table with the
--moduleId concatenated with the locale, in the form xxx-yyy. We use this
--information to track the correct entry in the MMLinksTitleLocales table.

SELECT
@localetext = LocaleText
FROM
dbo.Delisoft_MMLinksTitleLocales
WHERE
(CONVERT (varchar(5), ModuleId)+'-'+ LocaleKey) =
(SELECT SearchKey FROM SearchItem WHERE SearchItemID = @searchitemid)


--Once we have the localized text, do the update.
IF @localetext IS NOT NULL AND rtrim(ltrim(@localetext))<>''
BEGIN
UPDATE
dbo.SearchItem
SET
Title = @localetext
WHERE SearchItemId = @searchitemid
END

END


SET NOCOUNT OFF
END


If you want to see immediate results, just delete everything in your SearchItem table and do a content re-index from the Host Search Admin menu.

I'm anxiously waiting for comments.


kick it on DotNetKicks.com

Read more...

12/06/2007

Integrating the Lightbox JS 2.03.3 image overlay script with DNN

According to its creators, "Lightbox is a simple, unobtrusive script used to overlay images on the current page. It's a snap to setup and works on all modern browsers."

And it really does what they say. So, why not use it with DNN? The fact that it can also work with groups of pictures providing basic back/forward navigation functionality makes it ideal as a lightweight picture gallery. Of course, it can be used with single pictures too, eliminating popup windows in order to see a picture, complete with (optional) caption, at a larger size.

In order to get Lightbox to work, you first need to go get if from http://www.huddletogether.com/projects/lightbox2/ . There you can also see examples and the way you can integrate Lightbox in an HTML page. So we'll only concentrate on things needed to be done in DNN here.

Our aim is to integrate Lightbox with a specific skin, not with the whole DNN installation. This way we'll have more flexibility regarding access to hosted DNN installations which may only allow access to the "Portals" folder.

So here are our steps:

1. Under the skin folder you wish to use for your DNN portal, create a folder called "Lightbox" and drop the contents of the .zip file you downloaded there. Three directories will be created: js, images and css.

2. Delete the html file as it only serves as an example.

3. Append the contents of the lightbox.css file that you'll find in the css folder into your skin.css file. You can keep the lightbox.css file, but you'll only make things more complex :)

4. Delete the lightbox/css folder if you like, as it is no longer needed.

5. In the ASCX file you will be using for your skin, put the following code immediately after the "@Register" tags as follows:


<script src="
<%=skinpath%>lightbox/js/prototype.js" type="text/javascript"></script>
<script src="
<%=skinpath%>lightbox/js/scriptaculous.js?load=effects" type="text/javascript"></script>
<script src="
<%=skinpath%>lightbox/js/lightbox.js" type="text/javascript"></script>

Update: For LightBox v2.04, the second line must be:
<script src="<%=skinpath%>lightbox/js/scriptaculous.js?load=effects,builder" type="text/javascript"></script>

SKINPATH is a DNN token and will be replaced at runtime with your current skin's path.

6. Immediately after the above piece of code, insert the following code:


<script type="text/javascript">
var fileLoadingImage = "
<%=skinpath%>lightbox/images/loading.gif";
var fileBottomNavCloseImage = "
<%=skinpath%>lightbox/images/closelabel.gif";
</script>


Why do we need this? The javascript file declares these two variables supposing they will be inside a folder relative to the physical position of the script, but that's not how DNN works, since our current path is NOT the skin's path, but the root path of the DNN installation! So we must override the paths here in order to be transparent to the image paths (using the skin path). We also have the additional ability to change the images used for the "close image" function here.

7. Open your skin.css file, locate the part you have copied from lightbox.css and locate the #prevLink, #nextLink classes. Change the paths to the three images for blank background, previous and next picture mentioned there as follows:

../images/blank.gif to lightbox/images/blank.gif
../images/prevlabel.gif to lightbox/images/prevlabel.gif
../images/nextlabel.gif to lightbox/images/nextlabel.gif

These images are unfortunately defined by the stylesheet, so since we moved the contents to skin.css we must make the positions of the images relative to the position of our current skin file. I will say again that you could always include the original lightbox.css but the current way is just my suggestion.

Of course you can use any image you like for next, previous and close functions as long as you maintain correct paths.

8. Try entering some image links into a text/html module as described in the original instructions for Lightbox and see what happens. Note: You can't use the aspx page link provided by the file manager when using lightbox. You must provide the links exactly as described in their (simple) instructions.


Finally, if the required JS files seem too big (approx. 103K total size) you could always use a JScript compressor like http://javascriptcompressor.com/ to reduce the total file size.

Please send comments if something in the instructions is not correct, so as to have it immediately corrected.

Happy Lightboxing! :)

kick it on DotNetKicks.com

Read more...

11/03/2007

Video: Creating DotNetNuke Modules

A free video from JumpStart TV explaining how to create your own DotNetNuke modules. You can watch it online right here.

Read more...

9/29/2007

Using the ListX module to create a database-driven master-detail interface on a single web page

Warning: This article assumes that you're aware of the ListX module by Bi4ce and that you have a basic understanding of what this module does, as well as a basic understaning of what DotNetNuke is. This article requires you to have the ListX module installed in your DotNetNuke portal.

Needless to say I am not a Bi4ce employee, I have just been using ListX and I'm thrilled about what this module can do - ListX lets you effortlesly pull data from any data source into DNN and present it the way you want - even use AJAX to do it.

The title may seem complex at first, but in fact what I would like to demonstrate is the exciting functionality of the ListX module with which not only can you issue custom queries (for tables inside your own DotNetNuke database or for any other source) and display results as a grid or repeater-like style, but you can also easily create detail pages - AJAX-enabled - which can reflect your choice in the "master" part without even having to reload the current web page.

First of all, we'll need a table to pull our data from. For the sake of simplicity, we'll just use an existing DotNetNuke table which will contain data even in a default installation: The Tabs table. The Tabs table contains information about our DNN pages, i.e. the title, the id and so forth. In a default installation, the table is filled with our default page info along with all the administrative pages for the Admin and Host accounts. Of course, nothing stops you from using your own table that you may create inside your DNN database or even a table from an external database. ListX supports it all.

Let's just mention the SQL we'll be using to retrieve list and detail data, we'll be using the statements later in our respective ListX instances.

Query 1: The query that we'll be using to present a list of available entries for the Tabs table
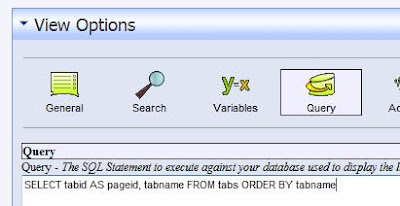
SELECT tabid AS pageid, tabname FROM tabs ORDER BY tabname DESC

Query 2: the query that we'll be using to present the details of a record
SELECT tabname, title, isvisible, iconfile, tabpath FROM tabs WHERE tabid = @pageid

If you're curious about the @pageid thing, have in mind that, when using the query in ListX, this will represent a parameter which will be replaced at runtime with the given tab id. The tabid field is a primary key for the Tabs table, so we're using this WHERE clause in our details query to ensure that it will return the requested record and that it'll be one and only one record.
Also notice that in Query 1 we give the alias "pageid" to the column "tabid". This is done because "tabid" is already a querystring parameter in DotNetNuke and we wouldn't like our Details module to confuse this querystring parameter for our own. More details on this will follow.

Finally, notice that in the details query we're just pulling some more columns from the Tabs table. I'm trying to keep this simple, so I'm not pulling too many columns - just enough to show a visual difference between list data and detail data.

It's time to create our first ListX component which will be the "master" part of our Master-Detail interface. Just add a ListX instance on any page you like (no details on that! If you're reading this you know how to do that! :).

- Click "View Options" on your new module's drop-down menu and you'll be transferred to the View Options page.
- Click the "Query" icon to show the Query section and query no.1 like this:


- Click "Save and Continue".
- Click the "Format" icon (you can click the "Query" icon a second time to hide the Query section).

Our next step is to define the template for showing our data. Click the pencil next to "List Item Detail" to edit the list item detail template and define a very simple template, like the following:
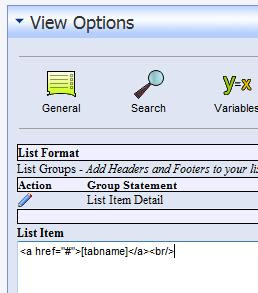


Note that this template doesn't provide us with any links in order to connect with the Details part of our page, but we'll add the markup for that later.


- Click "Save and Continue".
- Click on the "Format" icon again to make the section hide, if you like.


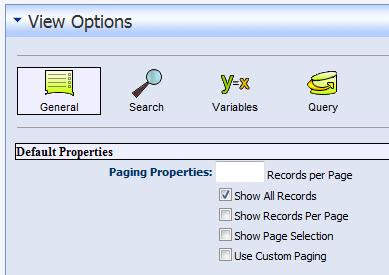
For now, we'll finish by checking the "Show all records" checkbox on the General section of the View Options page for our module, so that we can see the records. Click the "General" icon and check the "Show All Records" checkbox, as in the picture:


- Click "Save Configuration" to return to your page.


That's how our first result will look like:
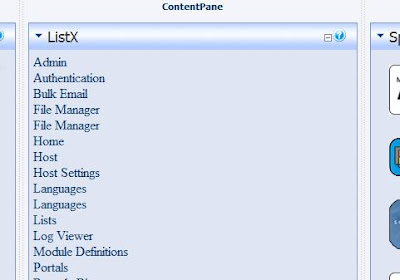


So we've got a list which comes from a query made on our Tabs table, which contains links that lead nowhere - for the time being. Let's start preparing our second ListX module instance - the details section. For that, we'll have to add another ListX instance on our page, directly beneath the first one. So, add a second ListX instance now.


For reasons of not being too verbose, I'll be skipping the steps on how to go to the various sections of the View Options page from now on. Be sure to click "Save and Continue" after you have finished a series of actions so as not to accidentally lose your configuration.


Working with our second ListX instance (the "detail" instance), we must also specify a query to pull data from our Tabs table. We'll use Query no.2 here, as follows:
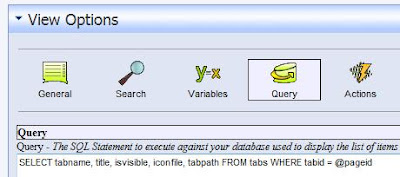


and a simple template in the Format section under List Item Detail for presenting our data:
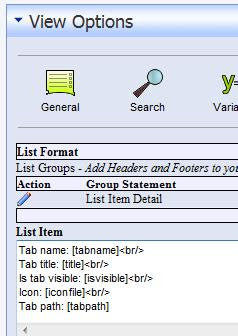

As usual, don't forget to check "Show all records" in the General section of our second module's View Options.


This is going to present us the details of a record selected in our first ListX module instance - but in order for this to work, we need to define one more thing in our Detail instance: The @pageid query parameter. This parameter will be coming from the QueryString (that's the way ListX works), so we've got to issue something like the following in the Variables section of View Options:



Details on how to do that (need to be a bit more explanatory here):


- In View Options, click the "Variables" icon.
- The Variables interface appears. Click "New Query Variable"
- Choose "QueryString" as the variable type from the Variable Type combo box
- Enter "pageid" at the Source textbox
- Enter "@pageid" at the Target text box
- Click "Save"


Remeber what I told you about querystring parameters? Tabid is already a querystring parameter (if you're using friendly URLs you'll see it appearing as /tabid/xxx where xxx is your page's id, and if you're not using friendly URLs you'll see it appearing as /default.aspx?tabid=xxx). Whatever the case, we've GOT to use another name for our parameter, hence the AS alias in our Query no.1 in the first place in order to be concise with the naming.


- Click "Save Configuration". You will return to your page.


What we did was to define a variable that will be contained in the querystring and will have the name "pageid". The value of that variable will go into the query parameter @pageid (remember our query?) so essentially our WHERE clause will get a record with a specific tab id.

But hold on. Aren't we supposed to make our first (master) module instance communicate in some way with our second (detail) instance and pass that variable?

Yes, we are. Since we've got the tab id value for every record in the first place (remember Query no.1), now it's the time to use it. Let's go to our first module's View Options and edit the Template section as follows:
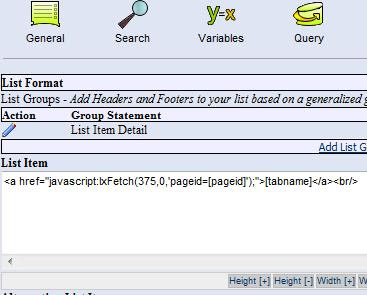


Notice the HREF part of our link. The lxFetch function is a JavaScript function defined by ListX and, in short, refreshes a given module passing it any number of name/value pairs for querystring variables needed.

The first argument is the module ID of the module we want to refresh (fetch). There are a number of ways to get to know the module number, the simplest of which is to look for the "mid" parameter value in our querystring when in View Options or Module Settings for our ListX module. In our case, our Detail module's id is 375.

You can find some information for the second argument in the ListX documentation, but it's ok for our example if we leave it with the default value 0.

The third argument specifies the name/value pairs that we want to pass to the module that will be fetching data (i.e., our detail listx module with module id 375). The [pageid] string will be replaced with the specific record's tab id (remember: tabid AS pageid) at runtime, so we'll have a different value for each record shown. This value will be passed to our "detail" listX module as a querystring variable (although the DNN page itself won't be refreshed and thus you won't be seeing the pageid variable in the actual query string) and it'll be used by our query as we specified.

The result is a master/detail interface in which the detail module's content will change WITHOUT reloading the page each time we click on one of our master module's links. Of course, you can extend that example and use your own table with better formatting on your master / detail modules (your master module's layout can easily become a multicolumn grid and your detail module's layout can easily be transformed to a neatly-aligned detail view)


This is a screenshot of our final result:


By clicking on any link on the first ListX module, the contents of the second ListX module change reflecting the selected record's details without the page being reloaded.

Of course, there are some more issues like what you can show when the page first loads (when there's no selected record), which are beyond the scope of this article. It's easy, though, to have the second module hidden at first, or have it present a message like "Please select a record".

Happy ListX'ing!


kick it on DotNetKicks.com

Read more...

9/26/2007

Testing the ISearchable interface

When you create a DotNetNuke custom module you often have to implement the ISearchable interface which allows you to integrate your module's data in DotNetNuke's Search indexer so that they are available when a user performs a search on your portal.

The ISearchable interface is very powerful but unfortunately there is no easy way to test your module's integration - except if you start trying random keyword searches hoping that some of your custom module's data will eventually come up in search results.

Mr. Nik Kalyani is aware of this problem and has published a solution here: http://www.dotnetnuke.com/Community/BlogsDotNetNuke/tabid/825/EntryID/1100/Default.aspx
This is esssentially an .aspx page which you can upload on the root folder of your portal. By specifying the tab id and the module id, you get all the results that have been indexed for that combination.

Time-saver!

Read more...

Getting locked out of DNN's login page

One common accident while developing DNN portals is to change DNN's default login page through the Site Settings page. This is ok, as long as the new page you set contains a user login module. But if the new page does not, you usually get "locked out" of DNN, not being able to login since there is no way to get to the login page again.

Here are two simple ways to overcome this:

1. If you have access to the DNN database, locate the Portals table and change the LoginTabId field to NULL. That way, DNN will be forced to serve the default login page. (The value you'll see in this field will be the tab id of the page you accidentally specified in the Site Settings page). Alternatively, you can run the following query using Query Analyzer or Management Studio (for SQL Server 2005): Update Portals Set LoginTabId=null Where PortalId=xx (where xx is your portal id - if you only have one portal then you should specify 0).

2. If you do not have access to the DNN database, you can use a solution provided by John Mitchell, right here. John provides a page which you can upload on your site. This page does the dirty work of updating the DNN database for you in order to be able to see the login page again.

Read more...
Related Posts with Thumbnails

Recent Comments

Free DotNetNuke Stuff

Free DotNet Videos

  © Blogger template The Professional Template by Ourblogtemplates.com 2008

Back to TOP